Showing posts with label side dish. Show all posts

Monday, February 16, 2009

Double Your Pleasure - Twice Baked Potatoes, that is!

Ah, the glorious spud. Did you hear the one about the girl potato and boy potato? It goes like this.

There once was a girl potato and a boy potato
who only had eyes for each other;
they married
and had a little sweet potato,
named Yam.

Okay, don’t judge me. Joke telling is not my forte. I do try; but mostly I’m just a “laugher” not a “teller”. My funny bone, uh, did find this a tad humorous. Hey! Remember ... no judging! :-)

What is your most favorite potato dish ever, ever, ever? Today’s recipe is so good, it’ll bump aside some of your old favorites, and take up residence, at the very least, on your favorite top five potato dish list. Two out of three of my picky eaters club members loved this. I mean LUVVVVVD this. Like the song says, two outta three ain’t bad!

These little beauties do take a bit of planning, due to the baking and all, but are easy, easy, easy to do. I’m all about the easy these days. Let’s start:

You will need:

4 large russet baking potatoes
2 cups shredded cheddar cheese, divided (If you have kids like mine, shred an extra cup beyond this because the little potato eaters will swipe finger loads of the yummy goodness while I’m cooking.)
5 strips of bacon, cooked and crumbled
2 green onions slice thin (optional – I left it out of my kids’ servings)
½ cup sour cream
4 tablespoons butter, sliced into pats
Freshly ground pepper
Lawreys Seasoned Salt

Heat your oven to 400 degrees.Hello my beauties! Place your potatoes on a foil lined baking sheet.Stab said potatoes a couple times with a knife or fork; nothing personal mind you, it’s to keep the spuds from exploding in the oven as they bake. Bake potatoes for 1 hour and 15 minutes or until soft.

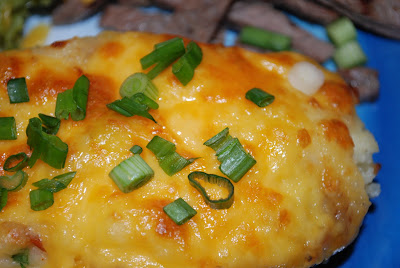
When potatoes are thoroughly baked, slice in half. Scoop the flesh out of each potato half leaving a canoe like shell.Place flesh in a mixing bowl and combine with butter and sour cream. Mash as you would for mashed potatoes, but leave them a little stiffer than traditional potatoes.Fold in 1 cup of cheddar cheese, bacon, seasoned salt, and ground pepper. If desired, stir in green onions.Refill the shells with the mashed mixture. Really mound it high. Sprinkle remaining cheese evenly over potatoes. Place back on baking sheet, and bake for 10 minutes. Crank up the broiler and broil until cheese is nicely browned, about 5 minutes. Serve. Make yummy noises.Just look at this! I served ours with thin grilled rib eye steaks that I cut into strips, and broccoli. My girls devoured them, and were quite disappointed that I didn’t have “extras” to give them. My son, the carnivore, ate his, but, well, the food groups in the potato were touching and you all know how picky eaters club members feel about food groups that touch. Still, he ate it without complaint. He’s getting better about stuff like that. My youngest asked me why I don’t always make “stuff” like this, and both girls chorused that I absolutely HAD to make this again, soon. Alrighty then.

Couple things, I think next time I’ll use chives instead of green onions for a more mellow flavor. I see no reason why you can’t microwave the potatoes for the baking portion, and finish them off in the oven. These are really filling, and could stand on their own as a main dish next to a leafy, green salad.You could also leave off the final cheese topping ... but why would you want to??? It’s CHEESE. Yum!

One more thing, these are gluten free, all the way, baby!Now, who wants to double their pleasure and have a twice baked potato?

Monday, November 10, 2008

Great Scot! Scottish Savory Oat Stuffing That Is!


My 7th grade son is currently reading Kidnapped, which takes place in the legendary Scottish countryside and coast. Written by Robert Louis Stevenson, the tale is told in 18th Century Scottish dialect, transporting my son back in time via vocabulary and phrases such as nae (no), ken (know), mair (more), dinnae (did not), and dirdum (blame). You all know how much I love words and word roots, so while my son's level of enthusiasm is, shall we say, not the same as mine, it's been fun for me to learn these Scottish phrases.

That brings us to our recipe for today. Delightfully labelled a “skirlie”, this is an oat stuffing whose roots trace back for centuries in Scotland. It’s a wonderful recipe, and is surprisingly light with terrific texture and full flavor. With Thanksgiving around the corner, I’m looking for alternative stuffing recipes for my wee bairn that cannae (cannot) eat traditional wheat based stuffings. Sure, I can prepare a rice stuffing, but one bite of this has assured and secured it a spot on our Thanksgiving menu this year. Besides, it’s fun to say. “Skirlie” Skirlie, skirlie, skirlie!

Let’s begin, shall we. Oh, one more thing, I tested this using chicken ... no sense at all in cooking up a big Turkey two weeks before reenacting the Pilgrim celebration after all. Ok, now let’s get to it.

Super Savory Stuffing – Scottish Skirlie Style
(It's gluten free, too!)

Ingredients:

½ stick butter
1 onion chopped
1 cup regular old fashioned oatmeal
Couple grinds of salt
Generous grinds of pepper
Scant ½ teaspoon coriander
¼ teaspoon nutmeg (I dinnae use this --- we’re not huge nutmeg fans)

1 whole chicken for roasting
3 large onions, sliced in half
Seasoned salt
½ stick butter, melted and combined with a couple tablespoons of canola oil

Preheat oven to 375 degrees.

In a 10” skillet, over medium heat, melt ½ stick of butter until it starts to bubble.Isn’t melted butter yummy looking? Add chopped onions and sauté until golden. Nope, they’re not golden enough yet.Okay, now they are golden. All at once, add the oatmeal and stir to coat with butter.Saute until toasted and slightly golden. You'll notice I'm not adding a drop of liquid here. We don't want this to turn into the consistency found in your breakfast oatmeal. Add your seasonings.Here’s the coriander in my pale, Pacific Northwest sun deprived hand. Hmm ... I have a relative who always wants to know how I know if I’m adding the right amount if I actually don’t measure everything. Let’s test shall we? I need a scant ½ teaspoon.I’ll just tip this into a measuring spoon and ... ta da! Oh ye of little faith. Not you, my blog friends, I’m referring to someone with the same blood line as myself. Hmphf. To be fair, though, she's usually asking me how much to add of something ... since I don't measure, I usually respond with "two shakes of this, or a couple grinds of that". Do you measure everything? Everything? Let me know.

Alrighty. Spoon your stuffing into a bowl to cool slightly while you prepare your bird. Place your chicken breast side up in a shallow roasting pan (I used Pyrex). Fill the cavity of the wee beast with the cooled skirlie. Don’t pack it it, it will expand while cooking. Place your halved onions all around the bird. NOTE: I didn’t lace up the chicken; instead I used the onions to prop up the chicken. I don’t usually stuff my poultry; I usually prepare the stuffing in a separate pan. So, therefore, I’m not much of a lacer. Feel free, of course, to lace up your bird. How many of you do that? Let’s take a quick poll ... how many of you are lacers? How many are not? Now season and baste your bird and onions with the butter/oil mixture.Pop it into the oven, and roast for 1-1/2 hours. Baste the bird and onions every 20 minutes or so.Just look at this gorgeous color! YUM! The meat is so moist!Just look, look at the breast meat!Mmm, a quick taste test ... and yep, it’s heavenly.See how crisp that skin is?

Hold on though, folks. It’s the stuffing we’re after today. Just look at this. For those of you who have only experienced oatmeal in sweet recipes, you are in for a treat with this savory version! This stuffing really has it goin’ on. The onion flavor really shines through, and the salt, pepper, and coriander hold their own. Let’s look closer. The texture is just outstanding. Remember: No added liquid (If you make it as a side dish, I'd use just a tad of broth.) It has a great al dente-ness about it; I’m quite pleased. Let’s try a bite. Oh, yeah, this is a keeper recipe for sure. Oh, and since this has no wheat in it whatsoever, this is gluten free, all the way baby! (NOTE: Some folks following gluten free diets have to abstain from oats as well. Use your best judgment in determining what's best for you and those you cook for.)

This Thanksgiving, I’ll be giving thanks for savory oat stuffing. Of course, I’m thankful for ALL stuffing recipes ... YUM. I can’t wait to say to those at the table, “Pass the skirlie, please!” What’s your favorite type of stuffing? Traditional? Do you have a special twist? I’d love to hear about it.

Friday, October 24, 2008

Roger Ramjet Would Approve Of This Noodles Romanoff!


If you think that I enjoy catchy phrases and plays-on-words, you'd be correct. My funny bone enjoys jousting with words, and the writers from the old, old, old TV show Roger Ramjet certainly shared my folly. With it's subliminal political commentary, Roger Ramjet was the patriotic but not too bright cartoon superhero who triumphed every week over the bad guys like his nemesis, the gangster named Noodles Romanoff (this was during the Cold War after all), and the foreign spy femme fatale Jacqueline Hyde (Jekyll and Hyde). He took orders from General GI Brassbottom, and he was often needing to be saved from the clutches of N.A.S.T.Y. (National Association of Spies, Traitors, and Yahoos). I don't really remember a single episode, but I do remember the theme song. Funny how that works, I can't remember where I put something, but I can remember just about every song from my childhood and teenage years.


Another thing I remember from growing up was a lovely noodle dish called Noodles Romanoff. It is a very simple peasant dish, but full of creamy goodness and is VERY filling. I promise you that this noodle dish is just the ticket for the cold nights many of us will be facing in the coming weeks. Pair it with a lovely roast, or spoon it next to a slice or two of meatloaf. Yep, I said meatloaf. That poor maligned entree that many folks actually love, but won't fess up to. I like meatloaf in the cold months, and I especially love the leftovers in sandwiches. But enough about that, here's the recipe for a Noodles Romanoff that Roger Ramjet would approve of:

2 Cups Cooked Noodles, hot(I used Kluski style)
1 Cup Small Curd Cottage Cheese
1 Cup Sour Cream
2 Tablespoons minced onion (I minced mine really small)
1 small garlic clove, finely minced (next time I might just use garlic powder)
Seasoned Salt (I used Lawrey's)
Couple quick shakes of red pepper or hot sauce
Quick shake of White Pepper
1/3 cup Grated parmesan cheese

Preheat the oven to 350 degrees, and lightly grease a 2 quart casserole dish. In a large bowl, combine the hot noodles with all the ingredients except the parmesan cheese. Spoon into the casserole, and top with the grated parmesan cheese. Bake uncovered for 35-40 minutes or until the top is golden. Serve.


This is so good and pure comfort food. Can you see that golden crust? There's no cheddar in this recipe, that golden color is from the parmesan and it adds a wonderful nutty flavor to the noodles. Every recipe I read discouraged adding additions to the dish such as mushrooms or veggies. It's meant to be a creamy noodle side dish. Alrighty then. I did sprinkle on some snipped chives for color though; parsley would work well, too.
Do you have any recipes from your youth that conjure up special memories for you? And ... what about meatloaf? Do you have a favorite recipe for that?

And, a very happy, happy birthday to my dear friend Marjie over at Modern Day Ozzie and Harriet.

**************************
Middle School Dance
One quick side note. My daughter attended the middle school sock hop dance tonight for 6th, 7th, and 8th graders and had a wonderful time. The school offered these for the first time starting last December, and she really enjoyed attending. Her entire 7th grade class attended (30 kids) and they all hung out in one big group. Everyone dances with everyone, and no one is purposefully left out. When hubbyman went to pick her up, my son tagged along. My son knows all these kids because he used to attend that school years ago and still plays CYO sports with them. ANYWAY ... my son went to sit on the bleachers to wait for his sister when an 8th grade girl came over and asked him to dance. He said, "No thank you," and the poor thing walked away.(OUCH. Picture me performing a big eye popping expression and saying, "YOU SAID WHAT?") I know this girl, she's a petite little thing, and is very cute and sweet. Anyway, said girl lamented to my daughter (who was dancing at the time) that her brother said NO. My daugther, while dancing with a boy herself, told the girl to ask again because she figured her brother was nervous. So, this girl gathered her courage again and this time brought a 7th grade girl who knows my son with her for moral support (my son is in 7th grade) and asked him again. How gutsy she was to ask again! Keep in mind that my son is now 5'8", 185 lbs, size 13 shoes, is rock solid, and dwarfs just about everyone in his old class and just towers over her. This time, hallelujah, my son said yes. So he had his first dance ... with an older girl no less. Afterward, all his old friends wanted him to join in with them, but it was time to head for home. They told him to attend next time. While he loves homeschooling, it's great that he can walk comfortably in both worlds. Then my littlest dancer at the ripe old age of 9 was wondering which boys would ask her to dance when she's older. Ah, and so it begins. GULP.

Thursday, August 21, 2008

Fantastic Performance Pumpkin Fritters

Today as I was chauffeuring my youngest to her swimming lesson, all the while feeling very proud that I had managed to feed the troops, get the laundry started, change the bed sheets, shower and get us out of the door by 9:20 am with minimal stress, I began to think about the Olympics. Tell me what you think of this. They should have an Olympic category for moms (and dads) to demonstrate how to manage a household and not, you know, go crazy. Moms from all over the world could demonstrate their multitasking skills of feeding, bathing, diapering, clothing, cooking, cleaning, laundering, improvising, budgeting, bandaging, refereeing, coaching, chauffeuring, and carpooling all within say ... a tidy 5 minute time frame. Can you just see a row of mom’s at the ready ... and then with lightning speed completing their task, hitting the buzzer, and throwing both arms up in the air shouting, “Done”!! Yes, it would be quite the event and one where every participant wins a gold medal just for taking on the challenge.

There is a beautiful young woman from South Africa who has taken on quite a challenge, and is the type of athlete who inspires everyone ... not just athletes. Have you heard of Natalie du Toit? She’s an Olympic swimmer from South Africa, and she carried in her nation’s flag at the opening ceremonies. I hadn’t heard of her until today, and her story is one of such great personal triumph that I just had to share her with you. Check out the link and be prepared to be inspired. Folks like Natalie encourage me to persevere and not let roadblocks break my stride. In simpler terms, she embodies the phrase, “when the goin’ gets tough, the tough get goin’”. In Natalie’s honor, tonight’s Olympic culinary adventure recognizes the cuisine of South Africa.

South African cuisine is a mixture of many cultures. I found recipes for stews and curries that made my mouth water. Some recipes contained ingredients I never heard of, and others contained familiar ingredients used in new ways. Based on my recent dessert making success, I thought I’d try out a sweet treat recipe called quite simply Pumpkin Fritters that I found on the good ol’ World Wide Web at 3men.com.

Pumpkin Fritters remind me of a warm, fancy donut that you’d find in a fine bakery. Covered in cinnamon sugar, these little fried fritters are considered a side dish; however, I think they would make a lovely breakfast pastry or after school snack. I did change the recipe a tad based on my cupboard contents. Plus, I altered the ingredients to make it gluten free. I’ll post the regular recipe as well as the gluten free changes.

These were good! You should have seen my littlest pumpkin’s eyes light up when she realized that there are foods like this that she can enjoy. Hubbyman snarfed down several in one-bite increments, and my older girl chowed down as well. I liked them, but one was enough for me as I’m not a big sweet eater. My son thought they were ok, but ate all of his anyway. I mean, come on, it was coated with cinnamon sugar! I think these would be great additions to breakfast trays at Thanksgiving and Christmas. In fact, I’ve filed away the recipe to use again when the holidays roll around. See how pretty they are on the inside? They are heartier than a donut, but not heavy. Uh, if they do add a mother venue to the Olympics, I'm really going to have to do something about those fingernails.

Pumpkin Fritters

- 2 cups cooked pumpkin, mashed (I used canned sweet potatoes and they were a terrific substitute).
- 1 egg
- 1 tablespoons of sugar
- 1/2 cup flour* (See below)
- pinch of salt* (See below)
- 1/2 teaspoon baking powder* (See below)

- 1 teaspoon cinnamon
- 6 tablespoons sugar

Combine pumpkin, egg, sugar, flour, salt, and baking powder in a bowl, making a soft batter. Fry spoonfuls in shallow oil till both sides are lightly browned. I just used a regular sized skillet, and a slotted spoon to turn them. Watch carefully as they can burn quickly. And, boy oh boy, if you aren't used to frying in oil, be careful not to burn yourself when you turn them over. Drain on paper towels. By the way, they weren't greasy at all.

In a plastic baggy, combine cinnamon and sugar. Gently toss each fritter with the mixture. Serve warm.

*Gluten Free Changes: I substituted a Gluten Free Baking Mix for the flour, salt, and baking powder. It worked beautifully.

Thursday, July 24, 2008

Wahoo! Summer Squash Ragu!

Ah, summer veggie season! This is the time of year when we all get creative with how to prepare the seemingly endless bounty of summer squash, tomatoes, and herbs strutting around our gardens and farmers markets. Zucchini is actually one of my favorite vegetables. I prefer them very small, no larger than 1.5” in diameter.

Here’s a dish that uses up both zucchini and yellow squash. It’s in the recipe family of caponata and pepperonata. This version, though, doesn’t have either eggplant or peppers in it, although feel free to add them if you have them! I ate this every summer growing up, as well as the other two dishes mentioned, and it is very tasty. It’s good either hot, cold, or at room temperature. I prefer it as a hot ragu over my gorgonzola polenta with an extra drizzle of olive oil , although it’s very tasty just as a side dish or with pasta or rice. Personally, I think it pairs best with either fish or chicken. It reheats very well, and is actually quite tasty as a brunch topper for fried eggs. Don't wince! It's really quite groovy over fried eggs! I dare you to try it! Double dare!

Ingredients:

Olive Oil
2 small zucchini, sliced thin
1 small yellow squash, sliced thin
½ onion sliced into either slivers or half rounds
1 garlic clove, sliced paper thin (or you could mince or chop it) *(See Note)
4 fresh “meaty” variety tomatoes diced (or 1 can diced tom’s)
¼ cup pitted green olives, rough chopped in large pieces (I used Spanish pimento stuffed ones because that’s what I had; calamata’s could be used, too)
1 Tsp of capers (optional)
Sea Salt
Fresh Ground Pepper
Freshly grated pecorino romano or parmesan cheese.

Heat a very large sauté pan over high heat. Add the olive oil, swirl to coat the pan. Quickly toss in the zucchini and yellow squash and sauté, adjust your burner heat as necessary to keep veggies from burning. When the squash are lightly browned, remove from pan. Add a touch more oil to the pan, and quickly sauté the onions and garlic* (see note). As soon as they are translucent, return the squash to the pan, add the tomatoes, and stir to combine. Turn the heat to med-low, and cook until the tomatoes are soft and the mixture has thickened (about 10 minutes). Stir in the olives and capers. Season with Sea Salt and freshly ground pepper. Garnish with cheese once you’ve plated the veggies. Also, drizzle with add’l olive oil if desired. (I desired!)

Also, for my gluten free comrades, this dish is gluten free all the way!

*NOTE: I always salt my garlic after I’ve sliced, minced, or chopped it. It keeps it from burning. We’ll have to ask Alton Brown as to why that is. I think it has something to do with the salt releasing moisture or some such thing. Do you know why salting chopped garlic keeps it from getting sticky and burning?

Monday, July 7, 2008

Ears and Eyes


While munching on the first of this year's sweet corn bounty, I wondered why, why do we call corn an "ear"? Who made that decision? Why did they choose ear and not a "leg of corn" or how about a "hand of corn"? The internet rescued me from my musing, and offered up the reason that long ago and far, far away, the Gothic unit of measure word "ahs" came over time to be pronounced "ears". I'm sure other cultures have similar sounding words, but by and large, those lovely golden beauties are called "ears". I don't really care what we call it, as long as I can eat it. There is nothing, I repeat, nothing that says "summer" to me more than fresh corn on the cob. And "on the cob" is how I prefer it. Even my youngest cob, who is missing 3 front teeth, loves to munch on those golden ears. My oldest cob absolutely devours corn with cartoon character efficiency, and can dispatch multiple ears before I even get my napkin in my lap. Picture him, sitting impatiently waiting for everyone to get to the table, then waiting an eternity longer so the prayer can be said, when all he wants to do is e.a.t. Imagine, if you will, the revving engine sound in his head, and the word "amen" at the end of our grace is the starters pistol firing off that he's "good to go". I sometimes sit there in amazement at his eating efficiency. Of course, he takes after his Dad who never ceases to amaze me at the sheer quantity of food required to fuel that man. Of course, hubby man never gains a pound. Grrrrr.

I've made corn all sorts of ways ... boiled, steamed, grilled, etc. ... but my favorite way remains good ol' boiled with a slight post-boil slathering of salted butter. That's it. I get a huge stock pot, fill it about 2/3rds with water, bring it to a rolling boil, carefully drop my clean ears of corn into the pot, bring back to a nice boil, turn it down to a simmer, and let it go for 5-6 minutes. Drain the corn and immediately rub butter on it. Done. That's it. It takes more time cleaning the corn than it does to cook it.

There are so many great varieties of corn, and I like the super sweet corn that's from the Midwest. Growing up in Indiana, even though I grew up in the city, my town was surrounded by hundreds and hundreds of acres of corn, some of it sweet and some of it field corn. My hubby helped his relatives farm when he was growing up, and when we were dating his uncle teased him to be sure to keep his mind on the tractor, combine or whatever it was he was driving and not on that little girl he was dating. (That would have been me!) I remember my not-yet hubby man driving me home from dates on those old country roads where you not only had to avoid crater sized pot holes, but you also had to be aware of mammoth water cannons that the farmers used to water the corn at night. Those things can shoot water great distances and I swear they used unsuspecting passer-by's as targets. The farmers would water at night to combat evaporation, and many a time we'd be driving home after dark, out where the only light was the car head lights, with windows rolled all the way down to escape the summer heat, and then ... out of nowhere ... BAM!!! we'd be soaked with spray from a wayward water cannon. Ah, but we were young and in love and stuff like that made us laugh. I suspect hubby man's vocabulary would be much more colorful if that happened now! Anyway, all sweet corn is great, and this city girl has a soft spot in her heart for all farmers, and a special affinity for those who grow sweet corn.

Eating all that corn was a special treat before heading off on our extended holiday get-away weekend. We loaded up the kids and van and headed up to a lovely town called Leavenworth, WA. It's about 5 hours from our home, but feels like we went to Europe. It's a darling little Bavarian village nestled in a beautiful mountain valley. It's a great spot for us because hubby man gets to go hiking and I get to hang out at the pool. And that's exactly what we did! Hubby man took middle child on an 8 mile hike up to a mountain lake; they had a blast. Oldest and youngest offspring hung out with me at the pool. The resort we were at had it's own mini-movie theater and we saw "Wall-E", went to Wenachee, WA to see the fireworks (great fun), played miniature golf, and the kids hit the arcade where the kids won all sorts of stuff.

One of my son's prizes was this huge helicopter that you launch from a hand held position and it takes off. I have to admit, it's pretty cool. He and his siblings loved it, and they had great fun playing with it. That is ... until ... the unfortunate incident. Long story short, the helicopter is supposed to launch away from you, but in a freak twist of fate, it launched backward and one of the propellers clipped my son's eye. His injury is right where the iris and cornea meet. His guardian angel (actually, I think he must have an entire team of angels) did a great job in that this injury will heal, but he's on "no activity" status ... can't bend over, ride his bike, go swimming, run, play ball, etc.
Basically, he has to wear these protective glasses (which is much better than the patch he had to wear the past 24 hours) and is relegated to the recliner for 5 days. At that time, he'll get his eye rechecked and activity can resume. Poor kid. He's bored, bored, bored ... and has had his fill of pirate jokes. Arggh matey!

Tuesday, June 24, 2008

Salmon: It's not just for Grizzlies ...


... but your family might snarl like one over the last piece of salmon prepared in this recipe! Here in the beautiful and bountiful Pacific Northwest, I have easy access to both fresh and smoked varieties. Grilled salmon is a frequent visitor to our table, and was front and center on our menu tonight. Our dining experience included Grilled Salmon with Onion Crispy Strips, Baked Tater Wedges, and Honey Fruit Salad. All yummy and all gluten free.

After having such great success a couple days ago with the dry rub used on the pulled pork, I got to wondering if such a rub would work on salmon, too. I've prepared salmon a million different ways, make that a zillion different ways (ok, that's an exaggeration -- but if you are what you eat, I can expect to grow gills soon), yet I've not actually put a dry rub on one and allowed it to cure for hours. So, after searching the Internet, I found a rub on the Family Fun site that sounded pretty good. I tweaked it just a little bit, and the results were pretty darn tasty.

To make this delectable salmon, you will need:

Enough salmon fillet(s) to feed your grizzlies, uh, I mean yourself and family.

Rub: 1 tbsp kosher salt, 1 tbsp brown sugar, 1 tbsp sugar, 1.5 tsp black pepper, 1.5 tsp celery seed, 1.5 tsp paprika, 1 tsp garlic powder, 1/4 tsp cayenne, 1/2 tsp onion powder, 1/4 tsp chili powder, couple shakes cumin.

Step 1: Combine the rub ingredients. Set aside a couple tsp's to use later on.
Step 2: Generously sprinkle the rub all over both sides of the fillet; really press it in with your hands.
Step 3: Cover with plastic wrap and refrigerate for at least a couple hours. (I did about 5 hours)
Step 4: Preheat gas grill on high.
Step 5: Remove salmon from the fridge, and rinse off the rub. Pat dry. Don't skip this step!
Step 6: Using the reserved rub, sprinkle a little bit on or just use salt/pepper or your favorite season salt. Lightly but completely coat the salmon with a little bit of olive oil. NOTE: At this point, I cut the fillets into squares. *Let's pause moment for those who never slice fillets.* Ok, for those of us who don't enjoy flipping entire fillets on the grill, go ahead and cut your fillets into palm size pieces. It makes serving a snap, and everyone feels like they are getting extra when they get two pieces. I assure you the salmon will not dry out. (Just check out the top photo!)
Step 7: Place salmon skin side down on super heated grill. Immediately turn the heat to med-low and CLOSE the grill lid. Let it sit for a full five minutes. Don't touch it. No peeking either!
Step 8: Open the lid, and with your handy dandy spatula, carefully flip the salmon over. Close the lid. Wait 3 more minutes. Open the lid again, and remove those beauties to a platter. Let them sit at least 5 more minutes before you serve them.

Step 9: Let your inner grizzly out and enjoy the feast.

NOTE: This could easily be done in the oven or stove top ... especially if you don't like grill marks on your food!

The Baked Tater Wedges were a snap. I used russets and sliced about 8 potatoes into 6-8 wedges each. Place the potatoes on a foil lined baking sheet, drizzle with olive oil, and sprinkle with season salt and pepper. I used Red Robin's brand of season salt and my cubs went wild over it. Bake in a preheated 400 oven for about 15 minutes, turn over the wedges, and put back in the over for about 15 more minutes. Keep an eye on them ... you're looking for golden brown not burnt. I was channeling Marjie and so I turned the broiler on for the last 5 minutes and got a real crispy golden brown lickety split.

The Honey Fruit Salad was a great compliment with the salmon. Simply slice up firm bananas, sweet or tart apples, blueberries, and strawberries. Er, um, you'll notice there are NO strawberries in my salad photo. You may recall my earlier post about the strawberry devouring debacle my grizzlies engaged in. Bottom line is I'm out of strawberries. Back to the salad ... drizzle with a couple generous swirls of honey and a splash of champagne vinegar. Toss gently and serve. If you don't have champagne vinegar, just use honey alone. There are some great desert wine dressings that you could make and serve with this, but my cubs were hungry and prowling the kitchen, so additional prep was not gonna happen.

The onion crispy strips were, I must say, outstanding. Like this entire meal, these puppies were gluten free, too. Thinly slice one sweet onion into half-rings (you could do whole rings, but I like half-zies). Place in a medium sized bowl and cover with 3 parts buttermilk and 1 part milk. Don't rush off to the store if you need buttermilk, you can just use regular milk. Cover and set in the fridge; I had them in there for about 2 hours, but I think 1 hour will do. When you are ready to make them, carefully heat up about 1 inch of oil in a heavy saute pan. I used my new cast iron skillet. Love that baby. In a pie tin, combine about 1 cup of gluten free all purpose flour with a couple teaspoons of corn starch, and a couple quick shakes of cayenne pepper. Remove the onions from the fridge, and drain them well. Working quickly, take a small handful of onions and toss them in the flour. Remove to a plate. Repeat until all the onions are coated. Now, carefully place small handfuls of onion strips in the oil. They should sizzle immediately. Adjust your heat up or down depending on the sizzle. You want the onions to have a strong, constant sizzle, but not a boiling sizzle nor a wimpy one. After you place the onions in the pan, stir them up a bit if they are clumped together. As they sizzle, occasionally flip them over so both sides are golden brown. With a slotted spoon or one of those special deep fryer slotted strainer gizmo's, remove the onions and place on a paper towel lined plate. Repeat with remaining onions. I used one onion and divided it into four or five batches. If your oil gets gunky, add a little more to the pan in between batches allowing time for it to heat up to be sizzle worthy. Oh, add a couple of grinds of sea salt on the crispy onions and you can call your grizzlies to the table to eat.

Sunday, May 4, 2008

Dreamy Beanies Please


My littlest offspring #3 was really sad yesterday. This is newsworthy because #3 is usually the happiest living being in the entire universe. Really. She's definitely a "cup 1/2 full" kind of child, so her quiet, glum little expression caused warning bells to rouse me to full mommy mode. After a quick check to insure that she wasn't feverish, and pulling her onto my lap, I asked "why the sad face, little peanut?". The proverbial dam burst open and the little lass poured out her dismay that she can't eat anything anymore. Ah, I fully understand. You see, in the past couple of weeks, I've removed, as best as humanly possible, wheat from #3's diet. Despite doctor's reassurances that stomach aches are common in children and that I should simply ply her with antacids, I've decided to trust my gut, as I should have long ago, and retort that no it's not ok for a child to have this many stomach aches, particularly a well adjusted, well loved, well liked sprite of a girl. Soooo, I removed wheat and what do you know ... no more tummy aches. Plus, both #3 and offspring #2 don't drink milk and can only have limited dairy (it's a milk protein thing, not a lactose thing). Now, while that may seem daunting, I'm pleased to report that there are actually zillions of choices of what to eat. Mostly meat, seafood, fruit, legumes, rice and veggies ... all of which are good for you. I'll admit that I miss being able to whip up a big batch of pasta (it's an Italian thing), and sandwiches and pizza are out, yet I also have to admit that it's actually working out quite well. An adjustment, for sure, but not that bad. Anyway, back to youngest offspring ... after a nice heart to heart chat, I got out my cookbooks and had her flag any recipes that she would like me to make. Said cookbooks now sport about 10 zillion post it notes flagging her stomach's desire. Her first request was "dreamy beanies, please" A variation of that wonderful concoction known as white bean spread; it's easy, fast, and full of protein. Simply blend white beans cooked with garlic, olive oil, rosemary sprig, a couple grinds of sea salt, and sage. (remove the rosemary before blending) A finishing drizzle of olive oil and a couple grinds of pepper make it a great appetizer or light lunch. I mash it by hand, but it's also delightful whipped up in the food processor. This photo shows it pared with Rice Chips. It's great spread on crostini, too. Next is our full flavor Santa Fe Stew. This made the entire house smell heavenly. I made it with ground turkey, but the meat can be completed omitted or feel free to substitute whatever type of meat you like. This comes together quickly, so prep everything in advance.

2 T olive oil
1 lb ground meat (I used turkey)
Salt to taste
1 large onion diced
2 tsp cumin
1/2 tsp cinnamon (yep, cinnamon)
2 large garlic cloves minced
1 cup minced peppers (I used a combo of Anaheim, Poblano, and regular green)
2 T chili powder
1 cups chix broth or water
1 medium (2 lbs) butternut squash, peeled, seeded, and chopped
Juice from 1/2 a lemon
1 can red beans, rinsed and drained

Heat the oil in a dutch oven, and add the meat, onion, salt, cumin and cinnamon. Cook over low heat until the onion is soft, about 10 min, stirring frequently. Stir in the garlic, peppers, and chili powder. Cover and cook about 5 more minutes. Add the broth or water, stir and cook another 5 minutes. Add the squash and lemon juice. Stir, cover and cook for about 15-20 minutes until the squash is cooked, but not mushy. Gently stir in the beans, cover, and cook for about 5 more minutes. Taste and adjust seasonings, adding more salt if you desire it. Serve hot as is or with warmed soft corn tortillas, a sprinkling of toasted pumpkin seeds, a little bit of cilantro, and sr. cream.

PS: Offspring #3 is once again a jubilant little sprite.