Well, here we are at my hundredth post! What a fun ride it has been! In keeping with the tradition that I’ve seen on other blogs, here is a list of 25 things about little ol’ me. It was supposed to be a list of, ahem, 100 things, but, well, I fear I’d loose you around number 25 anyway, so for both our sakes, here’s the abbreviated version of me.Before we get started, here’s a photo of where it all happens in my house: the kitchen. (Uh, the counters are actually a dull, and I mean dull, mauve. They always end up looking bright pink in the photos. I'd love to replace them with industrial kitchen stainless. Dream on!) Like many Italian households, the kitchen is the heart and soul of our home. The island is where I bandaged many a knee, where my kids hang out to chat with me, where homework gets done, where guests like to hang out, and where I prepare all our meals. As you look around, you’ll note the Medusa drawing taped to the cupboard, a memento from when my youngest was studying mythology. While all the art work and photos are kid related, the color swatches on the wall near the sink are mine. I’m toying with the idea of painting my kitchen a warm, Mediterranean yellow. Last, but not least, is my brand spanking new dishwasher delivered this past Monday. In the short time that I’ve had it, I’ve come to care for it very much.
I’ve also come to care very much for my blogging friends. I’m daily humbled that you folks visit my blog, and absolutely delighted when you leave comments. Don’t you love it when someone takes the time to leave a comment? It’s the equivalent of an in-person wave hello, how’s your day going? It’s been a joy getting to know your personalities, likes, dislikes, children, pets, trips, hopes, flops, and just overall who you are via the blogsphere. When I started this, I never thought that I’d enjoy cyber friendships with so many wonderful folks both here and abroad. I thank you sincerely for the kindnesses you’ve bestowed upon me.
1. I am the youngest of 3 girls. My oldest sister lives in Illinois, and my “middle” sister died 2 years ago at the young age of 46. I miss my late mom and late sister on a daily basis. They’re in Heaven hopefully saving me a seat, or at least on stand-by to sneak me in the gate!
2. I miss my dad on a daily basis. He lives 2000 miles away. That’s just wrong.
3. My oldest sister is a better sister than I am. She checks in frequently and adores my children. She’s a keeper.
4. Twins run in my family way back, on my mother’s side. My grandpa was a twin and had multiple twin siblings. Now I have twins; I like how that connects me with my ancestors.
5. I’m kind of an info nut. I was the kid that liked encyclopedia’s (Do students today even know what an encyclopedia is?), and even today I love all sorts of information sharing type books.
6. I enjoy reading cozy mysteries. Quick and easy, yet engaging and entertaining, they help me detox from daily life.
7. Like my mother before me, at one point, I was actually a great sketch artist. My son loves drawing, and has his own amazing style. My littlest girl likes to draw clothing designs, and just this week, I encouraged my middle girl to try her hand at drawing. She likes to draw little fantasy creatures. I love that because she’s otherwise such a serious kid.
8. I love being a mother, and would have loved to have more children. The three we’ve got are pretty darn special.
9. Until very recently, I never liked staying home alone. Now, I relish every moment I have to myself ... they are few and far between.
10. My friends would consider me to be very quiet and reserved. I’m much more exuberant in print than I am in person. Still waters run deep and all that!
11. I can count on one hand the number of good friends that I have. While their numbers are few, they are pure gold to me. It’s funny that I’ve always had friends who possess strong personalities, are socially secure, possess great senses of humor, and are not afraid to voice their opinions. I’m blessed to have them, and blessed that they'll have reserved me.
12. I was a very good girl growing up. It never occurred to me to disobey my parents or sneak out at night. Can you see my halo glowing?
13. I don’t like arguing, but I’ve gotten good at it! If only my hubbyman wasn’t so darn stubborn!
14. I enjoy visiting National Parks more than, let’s say, a casino. I don’t like crowds ... too much static! All those emotions in one space coming at me. Ugh!
15. More often than not, I will think of somebody and then all of a sudden they’ll call or leave me an email.
16. One day a few years ago, I was in the kitchen and clearly heard my daughter call out “mom” in distress. I swung around only to realize that she was at school. Just a minute later, the phone rang and it was the school calling me to tell me that my daughter had an accident on the playground, was scared, calling out for me, and could I come to the school. I have stuff like that happen a lot.
17. I love homeschooling my son. Everyday, a thousand times a day, I think about homeschooling all three of my kids again. What a grand adventure we would have! Well ... I would have, anyway!
18. I’m a math lover. Algebra floats my boat. Plus ... don’t tell my son ... I like to diagram sentences! He’d let out a mammoth moan if he heard that!
19. I’m not a great singer, but when I sang to my babies, I rocked. Anything from lullabies to country music to rock from the 60's, 70's, and 80's. Nowadays, my girls like to dance with me in the kitchen. My son just gives us "the look".
20. I used to be a gung-ho corporate manager. Wore fancy clothes, gave speeches to hundreds, managed multi million dollar budgets, won awards, traveled for work, etc. Then I had my babies and to everyone’s utter shock and surprise, walked away from the corporate life and never once looked back. ‘Nuf said.
21. The older I get, the more simplicity I crave. I grew up in a smaller town, moved to the bright lights, and now desire a slower, more relaxed lifestyle. I’m totally fascinated with homesteading, and while true homesteading is beyond my reach, I hope to embrace it as much as a city dweller can.
22. I’m a night owl, staying up until after 1:00 am most nights. I get up early by default, not by choice.
23. I look forward to reading all of your posts, and really try to leave a comment that lets you know how much I value you!
24. My good friend, Marjie, whom I’ve never met in person, is the one who provided the encouragement for me to start blogging. We are both homeschooling mom’s and she’s one of the first mom’s that I “met” via homeschooling through Calvert.
25. I would love to be a great gardener, successful writer, and Olympic Skater. Oh well, two out of three are possible!
Thanks, again, to all of you who’ve made the world a little closer, a little brighter these past 100 posts!
A little blog about life, family, food, and living in the beautiful Pacific Northwest
Thursday, January 29, 2009
Tuesday, January 27, 2009
Eggcellent Egg Salad Sammies with Tomato Orange Soup!
Ah, eggs. How do I love thee, let me count the ways. Fried, scrambled, boiled, poached, baked, stuffed, and .... made into salad. Egg salad, that is. Plain old, no frills, nummy-yummy egg salad.
Do you like egg salad? There are a multitude of ways to make this creamy goodness. Besides mayo, you could add any combo of onions, capers, olives, celery, mustard, cheese, bacon, dill, vinegar, salt and pepper, white pepper, peppers, hot peppers, pimentos, or even pickles. Man, that’s a lot of ‘P’s”! Me? Well, surprisingly I prefer it on the plain side. Just egg and mayo and a smidgeon of season salt. Plus, there are subtle differences on how to actually chop the eggs. You could mince them with a knife, slice with a gadget slicer, mash with a fork, or pulse in a food processor, to name just a few. Let’s address, too, the vast array of ways to serve the eggsellent spread. There’s the obvious choice to spread it on bread or toast, but there’s also folks who like to stuff tomatoes with it or serve it alongside crackers. To make me really dreamy eyed, serve the egg salad unadorned on toast (preferably rye). Throw in a bowl of tomato orange soup and I’m a happy gal. *Insert blissful expression here*
From what I can tell, there are no true regional or cultural recipes for egg salad. Mostly, folks just kind of make it the way their mothers’ did, occasionally trying something new, but reverting back to what their roots crave. That’s how it is with me. Egg salad in my house is simple fare, nothing fancy, but really tasty nonetheless. I don't dislike the other additions, rather I simply prefer it just like this. Let’s make Eggcellent Egg Salad, shall we?
Ingredients:
4 hard boiled eggs, peeled*
2 heaping Tablespoons good quality mayo
Smidge of Seasoned Salt
Rye Bread – toasted
In a medium sized bowl, chop the eggs into a very fine dice.I usually rough chop/slice it with a knife,and then mash it with the tines of a fork. I’ve used a grated potato masher, and that works well, too. I just don’t like to wash it, so I stick with a fork! Stir in the mayo.
Fold in the season salt. Serve immediately or chill in the fridge until cold. Tastes great both ways. Spread egg salad on rye toast slices. It’s your choice as to how thick you want to layer on the egg salad. I prefer a medium thickness, and naked. Meaning, ahem, lettuce or tomato can sit this one out. Egg salad sandwiches go great with fruit, soup, or even chips. Just look at how creamy this is!Not goopy, not dry, just right! I served mine with a yummy, tangy tomato orange soup.YUM!Now that we have our sandwich, let’s make some soup. I make soup every week, cuz, well, I’m souper girl. We souper girls love to have soup for lunch. This tomato orange soup is THE BEST tomato soup EVER! Well, um, at least I thought it was pretty darn tasty. Even with the heavy cream, it’s very light and that citrus flavor really brightens it up. It’s ridiculously easy to make. Seriously. It takes less than 10 minutes, but tastes like something from a fancy café. I found this recipe on the internet. As fate would have it, it’s from Elephant’s Deli in Portland. You won’t believe how good this is!
4 tablespoons butter
½ onion diced fine
2 cans diced tomatoes
¼ teaspoon baking soda
½ teaspoon thyme
½ teaspoon fresh ground pepper
1 cup fresh orange juice (I used Tropicana)
½ cup heavy cream
In a sauce pot, melt butter over medium heat. Add diced onions, and cook over medium heat until onion is soft but NOT brown. Lower heat if necessary to just soften them. I stirred the onions often, and they were soft in about 5 minutes. Add the tomatoes and bring to a boil. Add baking soda, thyme and pepper. Puree the soup with an immersion blender, or ladle into a food processor or traditional blender. I left a bit of texture in mine. Add the orange juice. Stir in the heavy cream just before serving.Mmmmm. See how pretty it is with just a tad of texture. Sample a bite and make yummy noises! Oh, and the soup is gluten free, all the way, baby!
*How To Make Hard Boiled Eggs
4-6 eggs (older eggs are easier to peel, but gee whiz, how often do you have old eggs?)
Large pot
Lid
½ teaspoon salt (if desired)
Place eggs in large pot and cover with COLD water. Water should be about 1 ½ inches above the eggs. Add salt if desired. Bring to a gentle boil, cover with lid, and remove from burner. Let sit for 12 minutes. Drain immediately, and cover with ice water for at least 10 minutes. Crack shells and peel. If your shells are really stubborn, peel them in a bowl of cool water. Watch your times closely so your yolks will stay a lovely yellow shade!
How do you like your egg salad? Do you like to add any of the items listed above to your mixture of eggy goodness? What about tomato soup? Do you wanna try some tom orange soup and join me in a blissful sigh?
Sunday, January 25, 2009
It's A Wrap ... Sushi That Is! Homemade Sushi!
Soooo .... What are your thoughts on sushi? Have you ever made sushi? When you think about it, all sushi is is rice, seafood, and veggies. I’m a total novice when it comes to sushi making. To be honest, I couldn’t tell you the difference between sushi and sashimi and all the other wonderful finger edibles gifted to us from Japan, but I do like them.
Granted, I’ve never dipped far into the sushi pool, mostly enjoying nummy little bits of cooked shrimp, crab, and salmon with rice. Last week, though, I saw some sushi at the grocery store, and thought to myself why buy day old sushi when I could tackle making it at home. I bought a little sushi rolling mat at the store for $1.50, and picked up some cucumber, avocado, shrimp, salmon, nori wrappers and sushi rice. I was going to get the veggies and seafood anyway, so all I needed was some nori wrappers and sticky style rice. I really wanted some crab, but since it’s currently priced at the equivalent of pure gold, I figured we’d forgo it this time around.
You’ll never believe what happened next. Wanna know what happened? Wanna know? Huh, huh? (Insert drum roll here.) My kids wanted to be involved in making it! My oldest and youngest were really interested, my middle girl kind of stood off to the side ready to nab any stray cucumber slices that might pass her way. My hubby remained noticeably silent which is an indication of not being thrilled. With a controlled glum expression, he wondered aloud what the nori would taste like, and I assured him that it’s flavorless. It adds a bit of color, but mostly it’s job is to help with the rolling process.
The internet provided lots of insight into the process. YouTube has gobs of sights showing how to roll the rolls, and one of my cookbooks had some great suggestions on different ways to form the little bundles of yum. Now I should point out that I didn’t attempt anything fancy, but it was soooo easy to make. In the end, everyone ate it! Hallelujah! Let me show you what we did!
Sushi Rice
1-1/2 cups sushi rice
2 cups water
2 T rice vinegar
2 T sugar
1 teaspoon – sea salt
Rice the sushi rice three times in a bowl of water. Put the rinsed rice into a heavy weight pot. Add 2 cups of water. Bring to a boil. Cover, and simmer on very low heat for 15 minutes. Keep lid on pot and remove from heat. Let sit 10 minutes. Transfer rice to a non reactive bowl. Combine rice vinegar, sugar, and sea salt in a small bowl. Heat for 30 seconds in microwave. Stir into the rice and combine well. The rice will be super sticky. That’s a good thing.
Shrimp Salad and Salmon Roll
1 cup – tiny little cooked shrimp (we call those popcorn shrimp)
½ cup mayo
Cooked smoked salmon – lox style sheets
nori sheets
sushi rice
cucumber slivers or shavings
thin slices avocado
black sesame seeds
Combine shrimp and mayo in a small bowl. Place a large sheet of plastic wrap on top of a sushi mat. Place one sheet of nori, shiny side down, on top of the mat. Spoon out enough rice to spread a thin but solid layer of rice over the nori. With WET hands, press down the rice until it is a uniform layer. Near one end, place a couple strips of cucumber. Do the same for the avocado.
Now put down a couple spoonfuls of the shrimp salad. Put down a couple strips of salmon. (I made some with and without the salmon).
Using both the plastic wrap and the sushi mat, very tightly roll the sushi. Using the mat, really pull on the roll to make it nice and tight.
Here's what it should look like when you are done rolling.It's nice and tight and uniform.I left the plastic wrap on it to help with slicing.Using a wet, sharp knife, slice into bite sized pieces. Wipe and wet the knife in between each slice. Sprinkle with black sesame seeds if desired. Serve with dipping sauce and/or spicy mayo.
Dipping Sauce
Mix equal parts mirin, wheat free soy sauce, and rice vinegar. I took it easy on the vinegar.
Spicy Mayo Sauce
½ cup Mayo
1 T Mirin
Dash Sesame oil
1 teaspoon Sweet Spicy Chili Sauce
Mix together in bowl. Adjust spiciness by adding more chili sauce
To make little formed nori-free bites, I used a plastic ice cube tray as a form. Wet the little compartments in the tray. Place halved cocktail sized cooked shrimp or salmon in the tray. Top with sushi rice. Really tamp down on the rice. Turn upside down, and firmly tap the tray to get the sushi free style bites out.Garnish with cucumber or avocado. My son loved the salmon ones.
For my oldest girl, who really wasn’t digging the sushi, I served hers “scattered” style in a bowl with sticky sushi rice, shrimp, avocado, and cucumber.Look at how gorgeous that shrimp is! She loved the rice. Not so crazy about the avocado, but I’m not complaining!There was NOTHING left! I was tempted to ask them, “Who are you and what have you done with my children?” In the end, though, I just smiled and ate my sushi, all the while thankful that the picky eaters club members branched out and tried something new. An added bonus is that these are gluten free, all the way, baby!
What about you? Do you like seafood, rice, and veggies? Think you’d like some of my sushi?
Wednesday, January 21, 2009
Super Savory Meat Pasty
Raise your hand if you like pie. How do you feel about savory pies? Savory pies cover a broad range of tasty goodness. There’re pot pies, quiches, and ...a hand-held wonder commonly called Cornish Pasties. Pasties (pronounced with a short ‘a’; rhymes with nasty) are distant cousins with those yummy Indian Samosas and delicious Mexican Empanadas. I’ve enjoyed eating Samosas and Empanadas, but I’ve never sampled or made a Pasty. Tonight that status changed as I made my first Super Savory Meat Pasty.
The origins of the Pasty are largely unknown, although they are commonly associated with the miners from Cornwall, United Kingdom. Years ago, miners’ wives prepared these baked envelopes of yumminess for their husbands’ lunches. The pasties were filled with meat and maybe a root vegetable, and sometimes were even divided into two sections ... one side savory and one side sweet. The miners tucked the warm pastries in their shirts to keep both themselves and their lunch warm, and the crusts edges served as handles for the miners to hold onto with their soiled hands. Legend tells us that the miners would toss the dirty, fingerprinted crusts deep into the recesses of the mines in fulfillment of superstitions about appeasing the mine spirits.
The only ones that I try to appease are the spirits of my kids and hubbyman. I was taking a risk making these as the food groups touch in this recipe, and that's usually a no-go for my older kids. Hubbyman, at first unsure whether or not to use a fork, ate his with gusto and ate all of his crust. I mean the man was picking up the crumbs to get every last possible bite. The two older beasts weren’t interested at all, but my wee one -- who could only eat the filling due to the wheat crust -- loved it. I thought the pasties, which were about the size of my hand, were gorgeous to the eye, and pretty darn tasty. See below for my suggested changes for next time. Also, before I begin, let me share that I used Pillsbury pie dough from the refrigerated case at the store and it performed beautifully. By all means, if you enjoy making your own dough, absolutely do so!
Here we go:
1 pkg of Pillsbury crust, unrolled and at room temperature
1 lb ground beef
1 tablespoon Olive Oil
1 tablespoon Butter
3 potatoes – diced
½ onion – diced
1 carrot – diced
Kernels from one cooked cob of corn (Note: Next time I’d use more)
Season salt
Black Pepper
Montreal Steak Seasoning
Couple dashes Worcestershire sauce
4 small pats of butter
1 egg – beaten- for egg wash
In a large dutch oven, heat the oil and butter together. Add the potatoes, onion, and carrot and sauté until the potatoes are almost tender and are starting to show some color. Stir in the corn. Add the seasonings and the ground beef to the pot, and quickly break it up with a wooden spoon. Cook until the pink is gone. Stir in Worcestershire sauce. Set aside to cool.
Place the crusts out on the counter (there are two circles per box), and cut each circle in half. You now have 4 half circles in front of you. Generously spoon a “mound” of meat mixture onto ½ of each of the four pieces of dough, keeping the edges clear.Place a small butter pat on top of the mound. Brush the edges with the egg wash, and fold the dough over the filling, pressing the air out as you seal up the edges.See how the pastry hugs the filling ... no air gaps. Crimp the edges to seal completely. Brush the egg wash over the entire surface. Cut a slit in the top to let out the steam. Place on a heavy weight non-stick baking sheet. Bake for 18 minutes at 400 F.See how they look going into the oven?Look at what emerges after 18 toasty minutes!Suggested changes for next time: Everything I read about pasties indicates that they are dry, both the filling and the outside. I think next time I’d serve it with a sauce or gravy. Also, I’d add more corn. I was really surprised at how much flavor and oomph it brought to the filling. You could also make mini versions of these for school lunches or appetizers. I think I’ll try different types of filling such as chicken/artichoke/cream cheese. Of course, that wouldn’t be authentic, but it’d be gooooood! YUM! What kind of fillings do you think would be good?
Tuesday, January 20, 2009
Inauguration Day Krispie Scotchies Dessert Bars
It's a special day here in the USA; our newly elected President Obama was sworn into office this morning. Like many Americans, I watched the ceremonies on TV with much interest and hope for the future. After the ceremonies, the President and other politicians joined together for a private luncheon. An announcement was made that the recipes for the luncheon received more hits than any other part of the inauguration website! We foodies know our priorities!
Actually, I haven't visited that website, but I did see the menu listed on another blog. It's kind of interesting how the whole Presidential luncheon thing started. From the main course to the dessert, the menus are planned well in advance and I'm sure thoughtfully and artfully put together.
Did you ever think about going into politics? I always wonder what drives someone to pursue the job of President or Prime Minister or whatever your country's top job is. When I was in 8th grade, it was our nation's bicentennial, and the school year was full of patriotism related activities. I remember seriously pondering what it would be like to be a Congressman, or Senator, or President, and I wondered at what age those who held an office had decided to pursue that dream. My oldest daughter is toying with the idea of running for middle school student council next year. Have you ever run for office, any kind of office? What was that like?
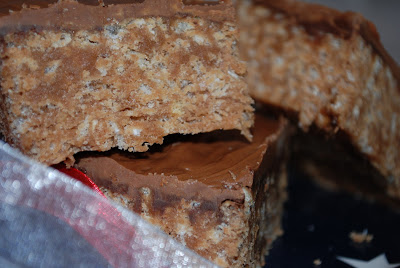
In honor of today's presidential inauguration, today's post at It's All Gouda is a sweet dessert bar recipe. Now I'm not much of a dessert baker or eater, and so you won't see many dessert posts here. As today is a special day, it's perfect timing to post something sweet. I call these lovely babies Inauguration Krispie Scotchies Dessert Bars, and I guarantee you they will be a hit with all who try them. They are safe for my gluten free future-voter, require no baking, are ridiculous easy to make, and are so incredibly yummy you'll want to share them with the entire world. They are a perfect marriage of texture and flavor, and a luscious treat for any special occasion. Here's to sweeter times ahead for the USA, and indeed, all the world.
Inauguration Krispie Scotchies Dessert Bars
1 cup Karo light corn syrup
1 cup sugar (told you it was sweet!)
1-1/2 cups creamy peanut butter
1/2 cup Nutella (you could just use all peanut butter)
5 cups rice krispie cereal (NOTE: Rice Krispies are not gluten free, but do not bother my daughter as her problem is with wheat. You could substitute Rice Chex which are now labelled gluten free, yeah!)
1 cup semi sweet chocolate chips
1 cup butterscotch chips
In a large non-stick dutch oven, combine the corn sryup and sugar, and cook over medium heat just until it bubbles (this happens pretty darn fast). Turn off the burner, and stir in the peanut butter and Nutella (YUM). Go ahead and lick the Nutella spoon, we'll wait. Okay, once the peanut butter and Nutella are incorporated, add all of the rice krispies. Put into a greased 13 x 9 inch pan. Press down with waxed paper or a silicone spoon. Melt chocolate chips and spread over the krispies. Melt the butterscotch chips and spread of the chocolate. You could melt them together since the chocolate and butterscotch will combine, but a thin layer of chocolate will remain if you do them separately. Let cool and cut into squares.
These are sooooo yummy. Despite what may at first glance appear to be coma inducing quantities of sugar, they actually are not cloyingly sweet. Much different than rice krispie squares, they boast a denser quality almost like a chewy candy bar and dessert mixed into one. Caramel type flavor as well as a faint hint of hazelnut from that wonder of wonders, Nutella, greet you with each bite.See the little rivers of chewy caramel type yumminess tunneling through the krispies? The peanut butter isn't overwhelming, and that chocolate/butterscotch topper is terrific.I didn't time how long it took to make these; it was something like less than 10 minutes. Super easy, and something that kids and grown ups alike will enjoy. Here's to making the world a sweeter place!
Saturday, January 17, 2009
Love Me Tender -- Pork Tenderloin with Caramelized Onion, Almond, and Apricot Stuffing that is!
I’m in love again. Head over heals in love and I’m announcing it weeks before Valentine’s Day. From the first moment my eyes gazed longingly upon the new object of my desire, the love spell was cast. The pitter patter of my heart raced with anticipation. Would everything of our first get together be as wonderful as I hoped? Would it be all that I longed for?
Okay, okay ... there’s no need to get all a twitter. I’m talking about tasting my new recipe for stuffed pork tenderloin! Gee whiz, what did you think I meant? hehe
Remember how you felt the first time you tried a new recipe and found it to be a real keeper? I mean, seriously, how many times do you really close your eyes and let out a moan when you take the first bite? This recipe is THAT good. I’ve never made anything like it and I’m just so pleased with it. The stuffing is just sooooo yummilicious, and the pork itself was perfect. Really folks, you MUST try this. It’s the stuff of legends. Well, okay, maybe not legends, but it’s 'love at first sight' good. The original recipe (Better Homes and Gardens) actually calls for it to be made with turkey tenderloins and served as an appetizer. I adapted it to be a main entrée and used that other white meat – pork. It is rather messy to assemble, but, oh baby, it is worth it. Come on, join me as we make ...
Love Me Tender
Pork Tenderloin with Onion Apricot Cream Stuffing
1 tablespoon butter
1 sweet onion – sliced into thin half rounds
¼ teaspoon black pepper
dash of cayenne pepper
1 Tablespoons brandy
6 dried apricots – diced
½ of an 8 oz brick of cream cheese – softened
1 pork tenderloin – trimmed of any exterior fat or sliver skin
¼ cup slivered almonds
1 tablespoon pistachios
drizzle of olive oil
Garlic Salt
5-6 long pieces of cotton kitchen string
In a large skillet, melt the butter over medium heat and add the onion. Toss gently and cook until the onion is tender and has turned a lovely golden color. Stir in the peppers. Remove from heat, and add the brandy, stirring to scrape up any bits from the bottom of the pan.Add the diced dried apricots, cover, and let stand off the heat for about 15 minutes. Stir in the cream cheese until it’s melted and everything is combined.
Heat the oven to 400F. Place a rack on a foil lined baking pan. In a small pan, over medium heat, toast the almonds and pistachios. It won’t take but a couple of minutes.After the nuts have toasted, chop the nuts as you would for baking. Now it’s time to butterfly the pork. This is the messy part. Very carefully, with a sharp knife, butterfly slice your tenderloin so that it lays flat in a rectangle shape. I actually used both a knife and kitchen shears. I wish I could have taken a picture for you, but my hands were really, well, gross. Anyway, pat your pork dry. Using a meat mallet, pound the pork until it is uniform in thickness. Really pound away. Now take your cream cheese mixture and spread it to within 1 inch of the edges. Take your chopped nuts, and sprinkle them on top of the cream cheese. Now roll your pork up lengthwise, jelly roll style. Try to make a tight roll. Tie at about 1-1/2 to 2” intervals with string. Rub with olive oil and sprinkle lightly with garlic salt. Place on the rack, and bake for 35-40 minutes.You can see that the stuffed loin reached from end to end on this rack.
See how much it shrinks when it cooks? Isn’t that incredible? That’s okay, I forgave it.I mean look at this!Isn’t this gorgeous? Remove from the oven, and allow to sit for about 10 minutes before slicing.Remove the string. It just peels away super easily.
Slice. Serve. Fall in love. Hum Love Me Tender(loin). This is so flavorful. You’ve got the wonderful pork paired with the creamy filling.The creamy filling, or stuffing I should say, is surprisingly light. The onion takes center stage, but the apricots and nuts definitely let it be known that they are at the party. This stuffing would go great rolled up in thin chicken breasts, plus it would be super easy to do with just regular pork chops.My youngest child loved this. Which reminds me, this is a GLUTEN FREE recipe, all the way, baby!
And, if you are in the mood to listen to some love songs while you savor your stuffed pork tenderloin, here is a list of the top 20 love songs of all time courtesy of the internet. Of course, I’m sure this list changes daily. Check it out and see how many of these you know!
1 WHITNEY HOUSTON -I WILL ALWAYS LOVE YOU
2 ELVIS PRESLEY -LOVE ME TENDER
3 CELINE DION -MY HEART WILL GO ON
4 JOURNEY -OPEN ARMS
5 PAUL MCCARTNEY & WINGS -MAYBE I’M AMAZED
6 RIGHTEOUS BROTHERS -UNCHAINED MELODY
7 LIONEL RICHIE/DIANA ROSS -ENDLESS LOVE
8 ELTON JOHN -YOUR SONG
9 JACKSON 5 -I’LL BE THERE
10 AEROSMITH -I DON’T WANNA MISS A THING
11 ETTA JAMES -AT LAST
12 BEE GEES -HOW DEEP IS YOUR LOVE
13 SINEAD O’CONNOR -NOTHING COMPARES 2 U
14 OLIVIA NEWTON-JOHN -I HONESTLY LOVE YOU
15 BILLY JOEL -SHE’S GOT A WAY
16 FRANK SINATRA -FLY ME TO THE MOON
17 FAITH HILL -BREATHE
18 PETER GABRIEL -IN YOUR EYES
19 CHICAGO -IF YOU LEAVE ME NOW
20 SONNY & CHER -I GOT YOU BABE
Tuesday, January 13, 2009
Hometown Patty Melts
Do you live in your hometown? By that, I mean the town of your birth? Small town? Big city? Open countryside? I spent the first 24 years of my life in the same town, my hometown, the town of my birth. After we graduated from college, hubbyman and I headed out to the Pacific Northwest eager to create a good life for ourselves all by ourselves. We were young, in love, and full of modern day pioneer spirit.
That was 22 years ago, and I’d say that we succeeded in our plans. We’ve lived 20 of those years in this house and this is the only home my children know. It is located in their hometown; the town of their births. It’s a big town, but a good one. Over the years, we’ve talked about moving – to a different house or a different state. My hubbyman is always the one to bring it up and he always brings up the same location ... southern Utah. He craves wide open spaces; however, we don’t want to uproot our children unless the advantages of moving far outweigh anything we’ve already got. We have always remained here, in our house, and have created many wonderful memories herein. Utah remains one of our favorite vacation spots, so he gets his outdoors Utah fix that way.
The other day, to no surprise, hubbyman brings up moving again. I tend to simply smile and nod, having lived through this conversation before. Now before you start thinking that my man is miserable because we’ve never moved, just brush that thought aside. If he really wanted to, we'd have moved long ago. ANYWAY ... so he starts the conversation the same as he always has. However, this time, he totally catches me by surprise. He doesn’t mention Utah. He mentions moving HOME. That word – home – refers to Indiana, the home of our respective hometowns, with streets, sidewalks, parades and parks we walked upon with younger legs. The state I met, fell in love with, and married my hubbyman. Where my dad lives, near where my sister lives, and close to all of hubbyman’s relatives. HOME.
Oh, that word is a powerful one. Will we actually move? Probably not. After all, where we live now is home to my children. But, oh, the thought of it. I’ve spent the last couple of days reminiscing about home. Small towns. Hot, humid summers. Lightning bugs. Acre upon acre of corn. Family. Gallons of iced tea. White Christmas’ every year. And sun. Lots and lots of sun. For days now, I’ve enjoyed my mental trip down memory lane.
Another memory I associate with home is eating Patty Melts. When we were dating, my hubbyman and I would meet for lunch at a local restaurant, and we always ordered the same thing. I would get the French Dip, and hubbyman would get a Patty Melt.
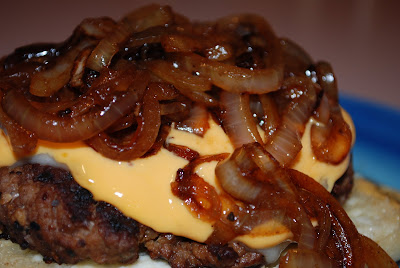
What’s a patty melt? Well, it’s a wonderful hamburger sandwich. On bread, you layer a hamburger patty, Swiss cheese, cheddar cheese, and grilled onions. Oh, and the bread should be both buttered and slathered with mayo ... and then grilled itself before you start the layering process. Take a walk with me down memory lane as we make a Hometown Patty Melt.
Hamburger patty – cooked the way you like it.
Thick slices of bread – you need something hearty. I used a ciabatta roll. Texas toast would work great. Rye bread would be outstanding, too.
Butter
Mayo
¼ cup water
Additional 1/4 cup water
Swiss Cheese
Cheddar Cheese
One onion sliced in ½ rounds
Here’s how I made it. I opted to pan fry the burgers ... usually I grill them, but I wanted some fond in the fan for when I sauteed/pan fried the onions. These aren’t caramelized onions. You’ll see what I mean in just a minute.
Season your ground beef to your own taste. I used that wonder of wonders called Montreal Steak Seasoning. Form kind of thick patties. Heat a skillet over fairly high heat.Place the burger patties in the pan, but don’t crowd them. Immediately turn the heat down to medium. Cook for about 5 minutes. Flip and cook on the other side for about 5 more minutes. Add ¼ cup of water; it should steam up significantly. Place a lid on the skillet, and steam the burgers until cooked through; about 3-4 more minutes. Take the lid off the pan, and remove the burgers to a plate. Cover with foil to keep warm. Boil off any remaining liquid.Add the sliced onions to the pan, and stir fry for a minute or two. Add another ¼ cup of water, and scrape up any fond on the bottom of the pan. Cook until the water has evaporated ... just a minute or two. Push the onions to the side of the pan.Return the burgers to the pan, and place your cheeses on it. Cover for a minute or two until the cheese is melted and gooey. Take your bread, and spread both butter and mayo on one side of each slice.Place spread side down in the pan, and toast it in the pan as much as you want. I went for a light toasting.Now assemble your sandwich and really pile on the sautéed onions. This is a really flavorful, filling, and messy sandwich. Slice in half and serve with something light like fruit or a salad.Hello baby! Don’t fret if some of the onions slide on out. Just snatch the little guys right up and pop them in your waiting mouth! Take a bite. Make yummy noises. Sadly, this version is not gluten free. Although, if you want to eat it steak style, simply serve it without the bread.Ah, one bite of this transported me back home. For any of you who are homesick, or for those of you who still enjoy living in your hometown, whether it’s located in a big metropolis or off of a small country lane, here’s a link to a tune from another Hoosier boy that I listened to way back when I lived in my own small town. This always makes me smile. And dance. Yep, I was dancing in my kitchen and eatin’ my patty melt. Singing with the radio. John Cougar Mellencamp singing “Small Town” http://www.youtube.com/watch?v=3eDkAG3R0h8
Saturday, January 10, 2009
Walking on Sunshine - Moroccan Orange Salad!
What are your thoughts about the food pyramid? You know what I’m referring to; that triangle shaped guide instructing us to eat X many veggies and X much protein, etc. per day. There are other guides, too. How about the one that is a divided plate indicating how much of your plate should be consumed by this or that food group? The divided plate one actually makes sense to me, and I subconsciously call upon it when I am serving my family.
One thing that I’m kind of, um, neurotic about is that my kids eat fresh fruit every day. Do you have any, shall we say, issues like that? Years ago, I told my hubbyman that the kids will snack on whatever is most conveniently available. If junk food is out, I contended, it would get eaten ... not because it was desired, but rather because it was easy to get. I didn't even want to start my snackers on that path, so began my quest for easy, accessible fruit. During the drizzly winter months, we rely heavily upon apples, bananas, grapes, and oranges. Come summer, our bounty explodes with bulging bowls of berries in all colors and varieties, and we experience magnificent melon mania until Fall. We eat 99.9% of all the fruit raw, and fresh fruit definitely has a foothold in making appearances at meal time, too. Oh we have the occasional potato chip and I, myself, have been known to crunch on a Frito, but for the most part, we want fruit.
It could have gone the other way, for me at least. When I was a kid growing up in Indiana, our annual school fundraiser was to sell ...wait for it, wait for it ... are you ready .... we had to sell crates of oranges and grapefruits. Good Lord, whose idea was that? Out of all the fundraisers on the planet, why oh why did they choose that? Yep, while other schools were out selling wrapping paper or popcorn or whatever, my school insisted on selling cases of oranges and grapefruits. (Okay, stop laughing.) The crates would be delivered in the throes of winter, supposedly bringing a bit of sunshine to all the folks trudging around in 3 feet of snow. Uh, yeah. Right. (Okay, you can join me in a major eye roll here.) I DREADED this every year. First off, I was such a shy little sprite, the thought of going around selling stuff was just wwwaaayyy outside the box for my little introverted persona. Then there was also the fact that those crates were unbelievably heavy and there was no way my little elf self would be able to lug those things around especially with 3 feet of snow. Thankfully for me, my parents never pushed me into childhood sales, and so I was spared having to hit the street and sell, sell, sell. Also, thankfully, my love of citrus was not deterred by the annual trama selling fest.
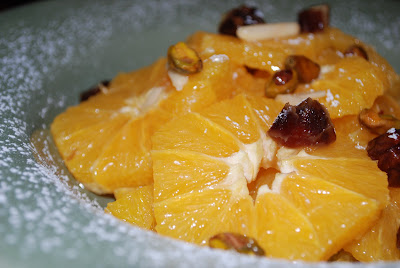
Despite all of that, now that I live in an area where I don’t feel sunshine on my face for extended periods, I find myself wanting some citrus sunshine during the winter. Popping a juicy orange segment into my mouth does bring a smile to my face, and perks me up. Today’s salad is a perfect example. Moroccan Orange Salad is very lovely and delightfully refreshing. The photos just don’t do it justice. It’s warm sunny orange color really perks up the plate, and it pairs perfectly with the heavier foods typically consumed during winter. Light and refreshing, bursting with dates, pistachios, and toasted almonds, it is loaded with those friends we hear so much about these days ... anti-oxidants. Give it a try the next time you serve steak, or kebobs, or even roast chicken. Plan your pyramid or plate to have meat, veggies, carbo’s, and Moroccan Fruit Salad. It’s sure to please the grown ups and kids alike.
Here’s all you need:
4-6 seedless oranges
¼ cup orange juice
¼ cup dates – chopped
2 T toasted almond slivers
½ teaspoon of cinnamon
1 teaspoon powdered sugar, divided
Peel the oranges taking care to remove all of the white pith. I used a knife.Check out the thickness of the pith! What a rip off! I thought I was buying giant oranges; turns out I was just buying pith. Slice the oranges into rounds, and place into a large bowl. Be on the lookout for little fingers and big ones, too, sneaking orange segments as you prepare this. Save all the juice that may have squeezed out during the peeling process. Add in the chopped dates, cinnamon, juice, and ½ of the powdered sugar. Gently toss to combine.You can serve immediately or put in the fridge to serve later. At serving time, sprinkle with the remaining powdered sugar if desired.Try a bite ... Mmmm ... start humming the song “Walking on Sunshine”. Do you like pistachios? I do.Oh yeah, look at all those little sunshine juice cells just waiting to burst out! The combo of cinnamon and orange flavor is amazingly good and very refreshing. The dates and the almonds add great texture as well as lend their yummilicious flavors. And the colors ... wow! This salad would be great all year long. And, like many of the recipes at It’s All Gouda, this is gluten free, all the way, baby!
Subscribe to:
Posts (Atom)