Saturday, February 28, 2009

Curdalicious -- Orange Curd!

Knock knock!
Who’s there?
Banana.
Banana Who?
Banana.
Banana Who?
Orange!
Orange Who?
Orange you glad I didn’t say banana?

Ahem. I did warn you a few posts ago about my challenges in the joke telling department. On the bright side, literally, today’s recipe for Orange Curd is top notch in the yummy department!

Most folks have heard of that sweet-tart taste bud tantalizer called Lemon Curd, as well as its cousin Lime Curd. Both are so nummilicious, and can be used as a spread, cake filling, tart filling, over ice cream, with cheesecake, or enjoyed right off the spoon. This past summer, I tasted a wonderful orange curd and was immediately hooked on its bright, sunny color and flavor. A couple days ago, as I was enduring my weekly grocery run, the citrusy scent of oranges was wafting throughout the produce section and immediately I started craving orange curd.

Finding orange curd recipes on the internet, however, proved to be more challenging. So, I made up my own, based on a lemon curd recipe from Fine Cooking found at http://www.finecooking.com/recipes/lemon_curd.aspx. This particular recipe for making the lemon variety was so different from anything I’d seen before, and I just had to give it a try. In this recipe, all of the ingredients are mixed together before cooking. You’ll see what I mean in just a minute. I altered it to make orange curd by including orange juice, taking care not to make it too sweet. The results were so amazing, and it was sooooooo simple to do. Let’s transform some OJ into OC. Are you with me? Let’s go. Orange Curd Ingredients:6 tablespoons of softened room temperature unsalted butter
1 scant cup sugar
2 large eggs
2 egg yolks
Five tablespoons of fresh lemon juice plus enough orange juice to equal 1/3 cup (I used Tropicana orange/tangerine juice. Of course you could use fresh squeezed and strained.)
Zest of lemon and orange to equal about ½ - 1 teaspoon

In a large mixing bowl, using a hand mixer, cream the butter and sugar together for about 3 minutes. Slowly add the eggs and yolks one at a time beating with the mixer until blended, another couple of minutes. Add the juice and zest, and, again, using the hand mixer, beat in until blended, just a minute or less.The mixture will look curdled, but don’t worry, it will cook up perfectly translucent.

In a heavy sauce pan, pour in the curdled mixture and heat over med-low heat, stirring constantly until the mixture coats the back of the spoon which takes about 15-20 minutes. Do not let the mixture boil at any time. The mixture will change from curdled, to opaque, to translucent during that time. To be honest, I didn’t stir it constantly until the very end, but I did keep a very close eye on it. When the mixture coats the back of the spoon, remove from heat. Let cool slightly, and pour into a container and refrigerate. Or, do what I did and pour it slightly warm over some darling individual angel food cakes.Oh mama mia, this is sooo good. It’s sweet and tart, and very refreshing. I served ours over little angel food cakes two ways. One with plain whipped cream and blueberries, and the other with whipped cream and chocolate. The fruit version was very light and reminded me of springtime.The chocolate version was equally good with that terrific orange chocolate flavor combo. Definitely curdalicious! Oh, and the orange curd is gluten free, all the way, baby!

So orange you glad you dropped by to hear about orange curd? Orrrange you? Come on over and have a bite!

Thursday, February 26, 2009

Ragin' Ragu & Rigatoni - Pasta with Paula Night

Do any of you remember the old, old, old pasta commercial from the early 70’s where an Italian mama opens a window, leans out, and hollers her son’s name, “Anthony” (pronounced just as my relatives would do it: An-toe-knee)? Then the narrator tells us that Anthony lives in the Italian section of Boston, home of Prince spaghetti, and that Wednesday’s are Prince Spaghetti Days. All the while, we see a young boy racing warp speed through crowded streets to get home in time for dinner. The advertising campaign was enormously successful for the makers of Prince spaghetti; obviously so as I still remember it and I was just a little kid myself at the time!

Growing up in an Italian influenced home, spaghetti often graced my plate in my formative years. We feasted on all different types and shapes of that semolina wonder food, and I particularly enjoyed every bite. I still do. It’s humble, economical, tasty, and downright easy to make. To be honest, we don’t eat fancy feasts in my house. I try to go for healthy and wholesome. And although there are as many recipes for “spaghetti” as there are Italian grandmas, I tend to default my preparations to be like that of my mom, and her mom before her, and so on. In fact, I bet if we compared recipes, all of you visiting this post probably have different sauce recipes. On the chance that there’s someone who hasn’t made their own sauce, I thought I’d share today’s recipe. When I first met my husband, he had NEVER once had pasta at home ... not spaghetti, not lasagna, nothing! Luckily for him (and me!) he loves Italian food. Hmmm ... perhaps those professions of love early on in the relationship were really based on food! Now that I think about it, he did eat over at our house often. Especially on pasta nights. Hmmm.

I’m of Southern Italian decent, so this sauce may be different than the bolognese sauces that grace many restaurant menus. First of all, in my household, pasta was always served with the sauce already tossed in, with an additional dollop of sauce on top. Additional sauce was passed around at the table. Meatballs prepared in the sauce were always served on the side. In addition, it was common to prepare the sauce not only with ground beef, but to also include chuck steak cut up as you would for stew. The cooked steak pieces would be spooned out and served on the side. Ground beef was ALWAYS part of the sauce, and we never added sausage. The sauce cooked for a long time, a couple hours at least. Contrary to what you might hear, you cook sauce a long time not only to thicken the tomato products, but also because the beef breaks down after a couple hours providing great texture as well as flavor. Otherwise, it just tastes like hamburger plopped in tomato sauce.See how the meat has broken down? My point in all of this is that if you prepare your sauce with ground beef, next time, allow it cook to for at least 2 hours. I promise you’ll love how the meat transforms. The longer you cook it, the thicker it becomes, so feel free to add a bit more water around the 1 hour mark if you don't want a thick sauce. I like it just medium thick, so 2 hours works great (I do add more water around the 1 hour mark). Oh, and if you make it a day in advance, all the better. The sauce improves with age.

Tonight was pasta night, specifically Rigatoni night. I love how the sauce gets trapped on the inside of the tube.See that meat tucked away in there? Hello Mr. Meat. You belong to me! Paired with a lovely plain salad and some garlic cheese toasts, it was a completely satisfying experience. Fancy? No. Wonderful? You bet! It’s ragin’ good. Again, nothing fancy here. Mostly it’s comprised of common pantry ingredients. Just a typical Pasta with Paula night. We always call the sauce, “spaghetti sauce” not ragu, no matter what type of pasta it’s served on. It’s really, really good. Hmmm. Hubbyman came home from work, ate his pasta dinner, and then went back to work. It must be love.

Here is the recipe for my all purpose sauce. As my go-to sauce, I use it for pasta as well as lasagna, polenta, and other recipes.

Spaghetti Sauce (aka Ragin’ Ragu)

2 lbs ground beef, 15% fat
generous amounts of onion salt, garlic salt, and black pepper
scant teaspoon of fennel seeds
1 mild onion – diced
1 garlic clove – minced (my cloves are large)
1 green pepper, cut into very large pieces. (It completely disintegrates in the sauce)
2 cans diced tomatoes (now behave; don’t judge me ... I like canned toms! If you can your own, use a quart of the red beauties.)
1 small can tomato paste
8 oz tomato sauce
3 tomato cans worth of water
1-1/2 teaspoons dried basil
1 generous teaspoon dried oregano
healthy dash of fennel (again)
Olive Oil – lots
Cooked pasta of your choice*

In a large skillet, season the ground beef with the onion salt, garlic salt, black pepper, and fennel seeds. Cook the ground beef, all the while breaking up the beef with a spoon, until just done. In a large dutch oven or large pot, heat a couple tablespoons of olive oil over medium high heat. Add the onions and garlic, and sauté for about 2 minutes or until just getting soft. Add the ground beef mixture, and stir. Add all the remaining ingredients, including another couple tablespoons of olive oil. Bring to a low boil, turn heat to simmer, cover, and simmer for at least 2 hours, stirring often. Add more water, about a cup, around the 1 hour mark if your sauce is too thick. Cool and refrigerate, or toss immediately with your favorite pasta.This is enough sauce for 1 lb. of pasta or a tray of lasagna. I’m sure it freezes great, but I never freeze it. I should embrace my freezer more. Do you freeze a lot?See the ridges in the pasta? Mmm, mmm, mmm! This sauce is gluten free, all the way, baby. *(Oh, in case you were wondering, I made a separate serving of gluten free rice pasta for my gluten free girl. Results: Awesome!)Here, you go. Have a bite. So, how do you make your sauce? Do you mix it in or ladle it on top? Either way, it’s all gouda!

Monday, February 23, 2009

Hey! It’s not a bottomless pot of ... Smoked Sausage and White Bean Soup!

Do you follow a cooking routine? By that I mean do you like to have or prepare certain things on certain days of the week? You know, like how Marjie makes brownies on Tuesday’s? Well, here in the It’s All Gouda kitchen, Sunday is soup makin’ day. I like to make a gargantuan pot of soup to provide a couple days worth of hot thermos lunches for my wee one as well as a couple steamy bowls for me for lunch. I eat soup year round, but especially savor it’s body warming qualities in the winter months.

Today’s soup is awesome! It’s another super-dee-duper easy recipe to put together, but tastes good enough for company. Both my husband and youngest daughter ate *3* servings of this in one sitting. T-h-r-e-e servings. Each. Bear in mind that the youngest spoon wrangler is only about 50 lbs fully clothed. After I had my one serving, there was only a whopping two servings left in the pot for weekday lunches. I informed these loves of my life that this was not a bottomless pot of soup. Without dripping a single drop as they shoveled in spoonful after spoonful, the perpetrators of this travesty ever so casually suggested that I should just, you know, whip up another pot full. Uh huh. Picture me ... incredulous expression plastered on my face ... opening and closing my mouth, with no sound emitting from said oraface, about four times before I just walked away. After all, what did I have to complain about. They ate it. With gusto. While making yummy noises. Little stinkers.

Won’t you join me now as we make It’s not a bottomless pot of Smoked Sausage and White Bean Soup. Here’s what you’ll need:1 tablespoon olive oil + 1 teaspoon of bacon drippings from breakfast
1 lb smoked sausage – cut into fourths and diced in ½ in pieces.
1 large onion – diced
2 carrots – diced
3 cloves garlic – minced with salt
1 can small white beans, drained and rinsed
1 can larger white cannellini beans, drained and rinsed (or just use a total of 2 cans white beans)
1 bay leaf
1 teaspoon dried thyme
3 15 oz cans chicken broth
1 cup water
dash cayenne pepper

In a large stock pot, heat the oil and bacon drippings over medium heat.Add the sausage, turn up the heat a bit, and sauté until browned. Remove the sausage from the skillet, there should be some fond in the bottom of the pan, stir the onions right into it. Saute for a couple minutes, then add the carrots. Saute the carrots and onions just a minute or two, then add the garlic. Stir frequently another minute or two. Add the sausage back into the pot. Add the beans, bay leaf, and thyme. Give a good stir, then add the broth and water. Sprinkle in just a wee bit of cayenne. Bring to a boil, reduce heat, and gently simmer about 30 minutes uncovered. Done.Mmm, mmm, good. Just look at that!Isn't it lovely?Go ahead, take a bite. Unlike many bean soups, this one is a brothy bean soup ... instead of a thick one. A simple salad and a hearty loaf of bread alongside would satisfy just about anybody. One bite of this will make you wish this really was a bottomless pot of soup!YUM! Oh, and this is gluten free, all the way, baby!

Friday, February 20, 2009

Sweet Heavenly Havana ... Cubano Sandwiches!

A few months ago, I went out to eat at a local restaurant chain called Stanfords. Shortly after placing my order, the server returned to our table and delivered the bad news that the kitchen was out of whatever it was I ordered. Rats! Um, no I didn’t order rats ... that’s just an expression.

Anyway, she handed me the menu to reselect an item and I just randomly picked the Cubano sandwich. The server, who appeared quite relieved that I wasn’t flipping out due to the order snafu, assured me that it really and truly was her most favorite item on the menu. Alrighty, then.

Well, the server knew her stuff. Sweet heavenly Havana, the Cubano sandwich was delightful. So delightful, that I’m thankful to both angels and fate for working together to enable the change of order. Who knew that crunchy bread, warm cheese, tangy mustard, pork and pickles could be so good? I was determined to recreate it at home.

Cubano’s, also called simply Cuban Sandwiches, are a delightful, hot, pressed pork sandwich. No exotic ingredients are needed here. Some recipes call for just pork, while others insist upon both pork and ham. Mustard is a must, as are pickles and swiss cheese. A nice hearty bread encases it all. While these would be very convenient to make in a sandwich press or panini machine, I mimicked the process by stacking a hot, heavy cast iron pan on top of mine. You’ll see what I mean in just a minute. Let’s begin, shall we?Gather these ingredients

1 hearty bread roll like ciabatta
Yellow mustard
Dill pickle slices
Swiss cheese
Pork ... sliced, shredded, etc.
Oil for greasing skillet
Aluminum foil
1 non stick skillet
1 cast iron skillet – heated

First, heat up a cast iron skillet until it is very warm, but not killer hot.Now, slice open your roll, and slather with yellow mustard.Then layer with a slice of swiss cheese,Then pickles,Then pork,Then some more cheese.
Cap it off with the other roll piece. Using papertowels, wipe a nonstick skillet with just a touch of oil, same as you would for pancakes. Heat this greased skillet on medium heat,Place sandwich in the skillet.Put a slice of foil on top, andThen put the heated cast iron skillet on top of the foil. The weight of the cast iron will press the sandwich flatter, and the heat of it will help cook the sandwich. Let cook until the bottom starts to turn a toasted golden color, then flip the sandwich, replace the foil, and put the cast iron pan back on top. Toast the bottom side just a couple of minutes. Remove from pan, and let sit for about a minute.Slice in half and serve. YUM! Pressing the sandwich really transforms it. The bread takes on an entirely different texture when pressed, and the pork goes so well with the other tangy ingredients.See how golden and crisp the bread becomes?You can eat these hot or cold. I like 'em hot! Do you want one? Come on over, and I’ll make cubano’s for everyone.

Oh, and be sure to visit Cheryl's blog, Cooking Dunkin Style. She posted an awesome Cubano today, too! Great minds and all that!

Wednesday, February 18, 2009

Incredible and Flexible ... Savory Breakfast Frittata Muffins! (new title!)

Let’s take an opinion poll. Raise your hand if you like to plan every little detail of your day/week ahead of time. Okay, now raise your hand if you really don’t see the point in getting things done early, just as long as they get done by when they are supposed to. Hmm, interesting. I’m curious how many of you/us are somewhere in between?

I’m sooo not a procrastinator. I’d much rather get stuff done ahead of time, than rush around at the last minute. That said, though, I’m pretty good under pressure and try not to wig out when fate messes up my plans. In a household with three active children and a husband who works ridiculous hours, it’s imperative that I go with the flow and allow lots of wiggle room for the unexpected. The best way for me to do that is to have a handle on the expected stuff. My method of madness keeps me sane, well as sane as I can be!

My point is that I like to stay on top of things so I can be flexible. Despite what my hubbyman may tell you, I’m not a total type A personality. (Insert hubbyman making a “yeah, right” face here.) While I admit that I do, ahem, possess some of those tendencies, it’s also fair to say that I can go with the flow, too. You know, be flexible. In the movie The Incredibles, don’t you just love how the mom’s super power is that she’s “flexible”! That’s me. F L E X I B L E. Go ahead, look it up. It will say, “see Paula”!Today’s recipe is something that allows me more flexibility in my morning routine. I used to eat these for breakfast back when I was working outside the home, and have recently rediscovered these wonderful little beauties. Say hello to these incredible and flexible, nummy, yummy savory breakfast muffins. They contain no wheat, reheat beautifully, and are really very, very satisfyingly good. This is a VERY flexible recipe. Let’s see how often we all can use the word flexible today. Seriously, though, this recipe is thrifty in that it uses up veggie leftovers, and doesn’t require a trip to the store for special ingredients. I can whip up a muffin tin full, and I've got breakfast at my fingertips for days. Plus, it contains my beloved eggs, so you can see why I’m so pleased with it. Let’s begin and make up some ...

Flexible Breakfast Frittata Muffins

6 large eggs
1 generous cup shredded cheddar cheese (or your favorite)
¼ cup crumbled bacon, ham, or sausage
¼ to ½ cup cooked veggies chopped fine such as broccoli, zucchini, mushrooms, spinach, etc. (I used chopped leftover broccoli)
Sprinkle of onions of some sort – either green onions, chives, sauteed diced, or dried. (I used dried this time.)
Season Salt or Salt and Pepper
Muffin tins, 6 size
Quart sized measuring cup

Preheat oven to 400 degrees. Grease your muffin tin, even if it is the non stick type. Crack the eggs into the large measuring cup, add a couple shakes of seasoned salt, and whip well with a fork. Place about a teaspoon of cooked veggies in the bottom of each muffin section of the tin. Sprinkle with your choice of onion (I used dried this time). Top with equal portions of meat (I used crumbled bacon) and then with equal portions of cheese. Pour the egg into each cup, filling about ¾ full. Take the fork and kind of push the cheese down a bit so that it gets egg on it. Put into the oven, and bake for about 25 minutes or until golden brown. Remove from oven and let sit for 5 minutes, then remove from the tins.If muffin filling pops over while baking, like mine did here, gently loosen the edges with a butter knife and it should pop right out of the tin.Hello, my sweet! See how beautifully they puff up! They don’t collapse, either. Enjoy! Oh, and these are gluten free, all the way, baby!A single muffin with some fresh fruit makes a great breakfast for me. These reheat beautifully in the oven or microwave, and the recipe can easily be doubled. I’m sure you could make this in a pan, but I prefer the muffin shape. With Easter around the corner, this would be good for brunch, too. The muffin shape makes them easy to serve, hold, and eat. YUM! It’s good to be FLEXIBLE!

Monday, February 16, 2009

Double Your Pleasure - Twice Baked Potatoes, that is!

Ah, the glorious spud. Did you hear the one about the girl potato and boy potato? It goes like this.

There once was a girl potato and a boy potato
who only had eyes for each other;
they married
and had a little sweet potato,
named Yam.

Okay, don’t judge me. Joke telling is not my forte. I do try; but mostly I’m just a “laugher” not a “teller”. My funny bone, uh, did find this a tad humorous. Hey! Remember ... no judging! :-)

What is your most favorite potato dish ever, ever, ever? Today’s recipe is so good, it’ll bump aside some of your old favorites, and take up residence, at the very least, on your favorite top five potato dish list. Two out of three of my picky eaters club members loved this. I mean LUVVVVVD this. Like the song says, two outta three ain’t bad!

These little beauties do take a bit of planning, due to the baking and all, but are easy, easy, easy to do. I’m all about the easy these days. Let’s start:

You will need:

4 large russet baking potatoes
2 cups shredded cheddar cheese, divided (If you have kids like mine, shred an extra cup beyond this because the little potato eaters will swipe finger loads of the yummy goodness while I’m cooking.)
5 strips of bacon, cooked and crumbled
2 green onions slice thin (optional – I left it out of my kids’ servings)
½ cup sour cream
4 tablespoons butter, sliced into pats
Freshly ground pepper
Lawreys Seasoned Salt

Heat your oven to 400 degrees.Hello my beauties! Place your potatoes on a foil lined baking sheet.Stab said potatoes a couple times with a knife or fork; nothing personal mind you, it’s to keep the spuds from exploding in the oven as they bake. Bake potatoes for 1 hour and 15 minutes or until soft.

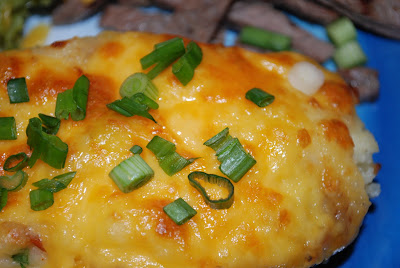
When potatoes are thoroughly baked, slice in half. Scoop the flesh out of each potato half leaving a canoe like shell.Place flesh in a mixing bowl and combine with butter and sour cream. Mash as you would for mashed potatoes, but leave them a little stiffer than traditional potatoes.Fold in 1 cup of cheddar cheese, bacon, seasoned salt, and ground pepper. If desired, stir in green onions.Refill the shells with the mashed mixture. Really mound it high. Sprinkle remaining cheese evenly over potatoes. Place back on baking sheet, and bake for 10 minutes. Crank up the broiler and broil until cheese is nicely browned, about 5 minutes. Serve. Make yummy noises.Just look at this! I served ours with thin grilled rib eye steaks that I cut into strips, and broccoli. My girls devoured them, and were quite disappointed that I didn’t have “extras” to give them. My son, the carnivore, ate his, but, well, the food groups in the potato were touching and you all know how picky eaters club members feel about food groups that touch. Still, he ate it without complaint. He’s getting better about stuff like that. My youngest asked me why I don’t always make “stuff” like this, and both girls chorused that I absolutely HAD to make this again, soon. Alrighty then.

Couple things, I think next time I’ll use chives instead of green onions for a more mellow flavor. I see no reason why you can’t microwave the potatoes for the baking portion, and finish them off in the oven. These are really filling, and could stand on their own as a main dish next to a leafy, green salad.You could also leave off the final cheese topping ... but why would you want to??? It’s CHEESE. Yum!

One more thing, these are gluten free, all the way, baby!Now, who wants to double their pleasure and have a twice baked potato?

Thursday, February 12, 2009

Shake, Rattle, and Roll -- Vanilla Milkshakes!

My youngest rattle and roller girl has been home sick with a whopper of a sinus infection since last Friday. Along with oodles and oodles of homework, school age children bring home all sorts of lovely ailments and injuries, and my 9 year old is no exception. After shelling out yet another co-pay at the pediatricians office, I told my daughter’s teacher that I was going to start sending my girls to school in “haz-mat” suits for the remainder of the year. Hmmm ... my homeschooled son doesn’t have this dilemma. Hmmm ...

ANYWAY ... when my kids are sick, they get spoiled. Whatever they want, (well, within reason) I’ll make for them. My sickie poo wanted a milkshake, so a milkshake is what she got. And her brother got. And her sister. And her dad. You see where I’m going with this.

Do you like milkshakes? I’m not a big ice cream eater (I can hear your gasp), but I concede that milkshakes are a good thing. Now many of you are ice cream makers; are you milkshake drinkers, too? Today’s recipe is a classic, pure, lovely Vanilla Milkshake. Puristically plain, but far from boring, it’s hails top honors from just about everybody who has uttered the phrase, “got milk”. Of course, there are enough varieties of milkshakes to keep dairy cows busy forever and eternity. Let’s see, there’s Strawberry, Chocolate, Eggnog, Blueberry, Peanut Butter, and Orange Crème to name a few. Let’s check out this recipe together, and see if you’d like to shake, rattle, and roll with me.Here’s what you’ll need
Vanilla Milkshakes

8 heaping scoops good quality Vanilla ice cream(I used Dreyers Vanilla Bean)
1 cup milk – don’t use non-fat
½ cup cream (I just poured mine in the measuring cup along with the milk)
2 teaspoons sugar
1 teaspoon Vanilla ExtractTo make this you will need one of these. It’s what I used today.Or you could use one of these. I love my immersion blender, and it makes great shakes.We won’t be needing this today. Look away, just look away from it.

Add all of your ingredients into the blender jar. Cover and blend until the ice cream and milk have a combined, smooth consistency. Don’t expect it to look like the cheek sucking thickness of what you’d find at Dairy Queen. Rather, it’s loose, but not runny.See it here on the spoon? That’s what you’re after. Mmmm ... come to mama! This will go up the straw without causing you to lose consciousness. In fact, when I first put the straw in the glass, it stood up and then ever so sloooowly leaned over.Ta-Da! Ooooh Yeahhhh! Mmm, mmm, mmm! This definitely will make your taste buds shake, rattle, and roll in a gooood way. Just in time for Valentine's Day, too. Oh, and this obviously is gluten free all the way, baby! What’s your favorite shake?